Whether you're considering DIY or hiring a pro, understanding the French drain installation process helps you spot quality work—and avoid expensive mistakes. Here's exactly how a French drain should be installed in Boise's challenging soil conditions.
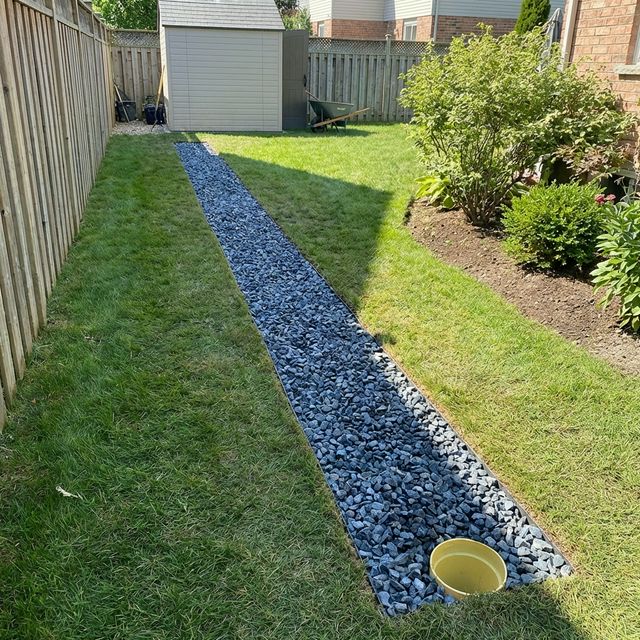
Completed French drain with gravel visible
Why Proper Installation Matters in Boise
Idaho's Treasure Valley presents unique challenges that cause many DIY drains (and some contractor-installed drains) to fail:
- Silty Soil: Fine particles clog drains without proper filter fabric
- Hardpan Layer: Calcium deposits require heavy equipment to penetrate
- Flat Lots: Many properties have insufficient natural slope
- High Water Table: Drains must handle significantly more volume during irrigation season
A properly installed French drain lasts 30+ years. A badly installed one fails in 3-5.
The Essential Components
Every French drain needs these four elements. Skimping on any of them leads to failure:
1. Perforated Pipe
Use: Rigid 4-inch Schedule 40 PVC with drilled holes facing down
Don't Use: Flexible corrugated "Big O" pipe—it crushes under soil weight
Why It Matters: Rigid pipe maintains its shape for decades. Holes face down because water rises INTO the pipe from below.
2. Washed Drain Rock
Use: 1-inch washed gravel with minimal fines
Don't Use: Road base, crusher run, or "bank run" gravel with dirt mixed in
Why It Matters: Clean rock has void space for water. Dirty rock clogs immediately.
3. Geotextile Filter Fabric
Use: Non-woven landscape fabric rated for drainage (4 oz/sq yard minimum)
Don't Use: Woven weed barrier or cheap "landscape fabric"
Why It Matters: Non-woven fabric lets water through but blocks silt. Woven fabric CLOGS.
4. Proper Slope
Required: 1% minimum grade (1 inch drop per 8 feet of run)
Tool: Laser level—not eyeballing or a bubble level
Why It Matters: Water doesn't flow uphill. Even small dips create ponding points.
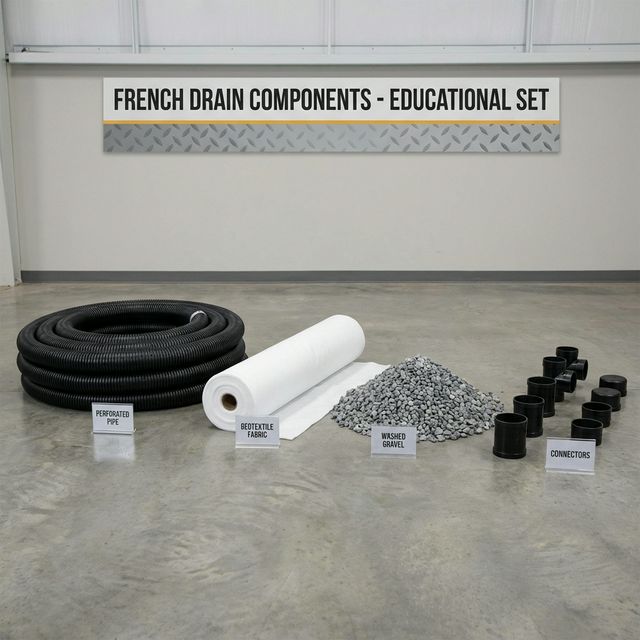
Essential French drain components: pipe, fabric, gravel, and connectors
Step-by-Step Installation
Step 1: Plan the Drain Path
Before digging, determine:
- Where water is coming FROM (uphill side)
- Where water will go TO (discharge point)
- Any obstacles (utilities, trees, concrete)
- Call Idaho 811 for utility marking (required by law)
Step 2: Excavate the Trench
- Width: 12-18 inches
- Depth: 18-24 inches typical; to footer depth for foundation drains
- Slope: Verify with laser level at BOTH ends before proceeding
In Boise hardpan, you may need a jackhammer or compact excavator. Hand digging is grueling.
Step 3: Line with Fabric
Lay filter fabric along the entire trench—bottom and sides—with enough excess to wrap over the top later. Overlap seams by 12+ inches.
Step 4: Add Base Gravel
Pour 2-3 inches of washed drain rock. Smooth it to maintain proper slope.
Step 5: Lay the Pipe
Place the perforated pipe on the gravel bed with holes facing DOWN. Connect sections with proper fittings—don't just push them together.
Step 6: Cover with Gravel
Add 6-8 more inches of drain rock, completely covering the pipe. Shake/settle the gravel with a rake.
Step 7: Wrap the Fabric ("Burrito Wrap")
Fold the excess fabric over the gravel, overlapping generously. This completely encapsulates the drainage layer, protecting it from silt infiltration.
Step 8: Backfill and Compact
Fill the remaining trench with excavated soil in 6-inch layers, compacting each layer to prevent settling.
Common DIY Mistakes
We repair failed drains all the time. Here's what usually went wrong:
- No slope or negative slope: Water pools instead of draining. Must verify with laser level.
- Wrong fabric (or no fabric): Drain clogs with silt in 2-5 years.
- Corrugated pipe: Crushes under soil pressure, especially in heavy clay.
- Holes pointing up: Water must RISE into the pipe from below, so holes go DOWN.
- Dirty gravel: "Road base" contains fines that clog instantly.
- No discharge point: Drain must go SOMEWHERE—can't just end in the yard.
Want It Done Right?
We offer free inspections and estimates. We'll assess your drainage needs and provide transparent pricing—no high-pressure sales.
Stop the Water Damage.
Water issues don't get better with time—they get more expensive. Get a professional opinion before the next storm.
Check My Availability